How to File a Homeowners Insurance Claim for Roof Damage (Without Losing Your Mind or Your Money)
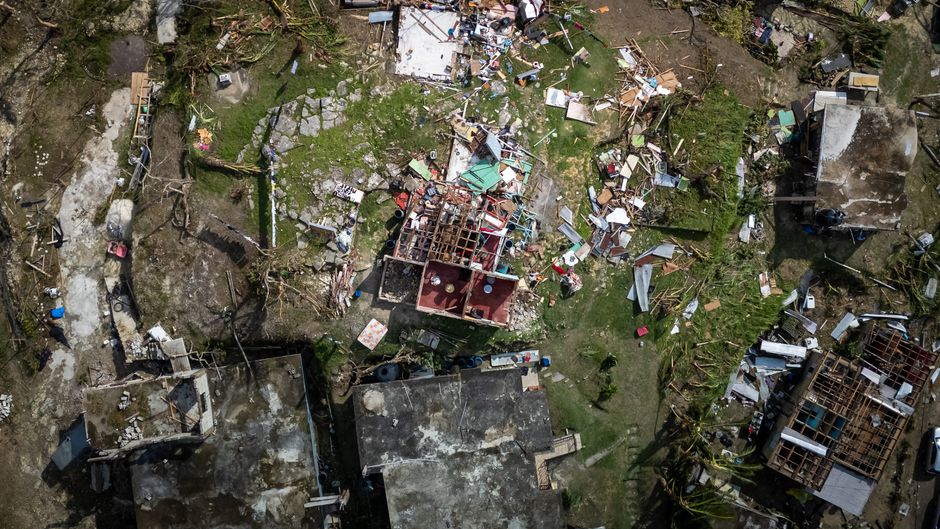
You wake up at 3 a.m. to a sound like a freight train hitting your house. By morning, half your shingles are in the neighbor’s yard, water is pouring through your ceiling, and your living room looks like a swamp. Your stomach drops. This is the moment you’ve been dreading — and the moment your homeowners insurance is supposed to save you.
Here’s the shocking truth most people don’t learn until it’s too late: roughly 40% of all homeowners insurance claims for roof damage are either underpaid or denied outright, according to a 2024 report from the National Insurance Consumer Coalition. That means millions of homeowners are leaving thousands of dollars on the table — or getting nothing at all — simply because they didn’t know how to navigate the claims process.
This isn’t just about paperwork. This is about protecting the single largest investment most families will ever make. And if you think your insurance company is going to look out for your best interests first, you’re about to get a wake-up call.
In this guide, I’m going to walk you through the entire process — step by step — so you can file your roof damage claim with confidence, avoid the traps that cost homeowners tens of thousands, and actually get what you’re owed.
The $12,000 Mistake That Changed How I Think About Insurance Claims
Let me tell you about my friend Marcus. In the spring of 2023, a severe hailstorm ripped through his suburb in Dallas, Texas. His 18-year-old asphalt shingle roof took a beating. Dents everywhere. Granules in the gutters. A visible crack along the ridge cap.
Marcus did what most reasonable people would do. He called his insurance company, filed a claim, and waited for the adjuster to show up. The adjuster spent maybe 45 minutes on his roof, took some photos, and came back with an estimate of $4,200 — barely enough to cover the deductible and a few minor repairs.
Marcus almost accepted it. He was tired, overwhelmed, and trusted that the insurance company had done its homework.
Then his neighbor — a retired contractor — told him to get an independent roof inspection. Marcus hired a licensed roofing contractor who documented $16,800 in damage, including hidden moisture intrusion and compromised underlayment that the insurance adjuster completely missed.
After filing a supplemental claim with the contractor’s documentation, Marcus ultimately received a payout of $14,600 — more than three times the initial estimate.
“The insurance adjuster isn’t your advocate,” says Dr. Laura Chen, a property insurance policy analyst and former claims reviewer. “They work for the company. Their job is to settle claims accurately from the company’s perspective — which sometimes means finding reasons to minimize payouts. Homeowners who understand this dynamic and prepare accordingly consistently receive fairer settlements.”
Your takeaway right now: Never accept the first estimate without getting an independent assessment. The difference could be thousands of dollars.
Why Most Roof Claims Get Denied (And the One Thing You Can Do to Prevent It)
Here’s a counter-intuitive fact that might surprise you: the number one reason roof claims get denied isn’t fraud, lack of coverage, or pre-existing damage. It’s improper documentation.
According to data from the Insurance Information Institute, approximately 23% of denied homeowners insurance claims in 2023 were due to insufficient or late documentation — not because the damage wasn’t real, but because the homeowner couldn’t prove it happened during the policy period or wasn’t caused by a covered peril.
This is where most people fail. They see damage, they feel the urgency, and they call their insurance company immediately. But they haven’t taken a single photo. They haven’t secured the area. They haven’t written down what happened, when it happened, and what they observed.
Think of your insurance claim like a legal case. The burden of proof is on you. And if you can’t prove it, it didn’t happen — at least not in the eyes of your insurer.
Here’s what you need to do the moment you discover roof damage:
- Document everything immediately. Take photos and videos of every angle of the damage — from the ground, from the attic, and (if safe) from the roof itself. Capture timestamps. Photograph debris, water stains, displaced shingles, and any interior damage.
- Write down the details while they’re fresh. Date, time, weather conditions, what you heard or saw, and the sequence of events. This written account can be critical if there’s a dispute later.
- Prevent further damage. Cover broken areas with tarps, move valuables away from leaks, and take reasonable steps to stop the damage from getting worse. Most policies require this — and failing to mitigate damage is another top reason claims get reduced.
- Do NOT make permanent repairs before the inspection. Temporary fixes are fine. But if you replace the entire roof before the adjuster sees it, your claim will almost certainly be denied.
The one thing that prevents most denials: A paper trail so thorough that the insurance company has no room to argue. Photos, videos, written statements, weather reports, and independent inspection reports create an airtight case.
The Step-by-Step Blueprint: How to File Your Roof Damage Claim the Right Way
Now let’s get into the actual process. Follow these steps in order, and you’ll dramatically increase your chances of a successful, fully paid claim.
Step 1: Review Your Policy Before You Pick Up the Phone
Before you file anything, pull out your homeowners insurance policy (or log into your insurer’s portal) and understand exactly what you’re working with. Specifically, look for:
- Your deductible amount — This is what you pay out of pocket before insurance kicks in. If your deductible is $2,500 and the damage is $3,000, filing a claim only nets you $500. In some cases, it’s not worth filing.
- Coverage type: Actual Cash Value (ACV) vs. Replacement Cost Value (RCV) — ACV factors in depreciation, meaning you’ll get less for an older roof. RCV covers the full cost of replacement. This distinction can mean a difference of tens of thousands of dollars.
- Named perils vs. open perils — Does your policy cover all causes of damage, or only specific named events (like hail, wind, fire)?
- Exclusions — Some policies exclude damage from wear and tear, neglect, or certain types of storms. Know what’s excluded before you file.
Pro tip: If you can’t find your policy documents or don’t understand the language, call your agent and ask them to walk you through your coverage. Do this before filing a claim.
Step 2: File the Claim Promptly
Most policies require you to report damage within a specific timeframe — often 30 to 60 days after the event. Don’t wait. Even if you’re unsure whether the damage is severe enough to file, report it. You can always withdraw a claim, but you can’t file one after the deadline has passed.
When you call:
- Have your policy number ready.
- Describe the damage factually and specifically.
- Ask for a claim number and the name of your assigned adjuster.
- Request a copy of your full policy if you don’t have one.
Step 3: Get an Independent Roof Inspection (This Is Non-Negotiable)
Before or shortly after the insurance adjuster visits, hire a licensed, independent roofing contractor to inspect your roof. Not a contractor who offers to “handle everything for you” in exchange for signing over your claim (that’s insurance fraud in many states). A legitimate contractor who provides a detailed written report with photos.
This independent report serves as your evidence. If the insurance adjuster’s estimate is low — and it often is — you have professional documentation to challenge it.
“Homeowners who come to the table with their own independent inspection report are in a fundamentally stronger negotiating position. It levels the playing field and signals that you know your rights.” — Robert Alvarado, licensed public adjuster and author of “The Homeowner’s Insurance Claim Handbook”
Step 4: Meet the Insurance Adjuster Prepared
The adjuster’s visit is the most critical moment in your claim. Here’s how to handle it:
- Be present during the inspection. Don’t let the adjuster walk your roof alone. Point out every area of damage you’ve documented.
- Share your independent contractor’s report. Hand them a copy. This forces them to address the discrepancies.
- Ask questions. What’s included in the estimate? What’s excluded? How did they calculate the scope of damage?
- Take your own photos and notes. Document what the adjuster examines and what they might have missed.
Step 5: Review the Settlement Offer Carefully
When the insurance company sends their settlement offer, don’t just glance at the bottom line. Review the line-item breakdown. Look for:
- Missing damage areas
- Underestimated repair costs
- Depreciation deductions you may be able to recover (especially with RCV policies)
- Code upgrade costs (if local building codes require upgrades during repair)
If the offer is low — and statistics suggest there’s a strong chance it will be — you have options.
Step 6: Negotiate or File a Supplemental Claim
You are not obligated to accept the first offer. Here’s your playbook:
- Write a formal dispute letter outlining the discrepancies between the adjuster’s estimate and your independent report.
- Include supporting documentation — photos, contractor estimates, weather reports, and any expert opinions.
- Request a re-inspection with a different adjuster if necessary.
- If negotiations stall, consider hiring a public adjuster. These are independent professionals who work for you, not the insurance company. They typically charge 10-15% of the final settlement, but studies show they increase claim payouts by an average of 30-40%.
- As a last resort, file a complaint with your state’s Department of Insurance or pursue mediation/appraisal as outlined in your policy.
ACV vs. RCV: The Coverage Difference That Could Cost You $20,000
One of the most consequential — and most misunderstood — aspects of homeowners insurance is the difference between Actual Cash Value (ACV) and Replacement Cost Value (RCV). This single distinction can be the difference between a $5,000 payout and a $25,000 payout for the same roof.
Here’s a detailed breakdown:
| Factor | Actual Cash Value (ACV) | Replacement Cost Value (RCV) |
|---|---|---|
| What It Covers | Cost to replace the roof minus depreciation (age, wear, condition) | Full cost to replace the roof with similar materials, no depreciation deduction |
| Payout for a 15-Year-Old Roof | Significantly reduced — often 40-60% of replacement cost | Full replacement cost (minus deductible) |
| Typical Premium Cost | Lower premiums — averages 15-20% less than RCV policies | Higher premiums, but substantially better coverage |
| Depreciation Recovery | Not applicable — depreciation is permanently deducted | Initial payment may be ACV; remaining depreciation is reimbursed after repairs are completed and documented |
| Best For | Older roofs nearing end of lifespan, budget-conscious homeowners | Newer roofs, homeowners who want full protection, high-risk weather areas |
| Hidden Catch | You’ll likely pay thousands out of pocket even with a successful claim | You must complete repairs and submit proof to recover full depreciation — if you don’t, you leave money on the table |
The bottom line: If you have an ACV policy and your roof is more than 10 years old, your payout may be shockingly low. If you’re shopping for a new policy or renewing, strongly consider upgrading to RCV. The slightly higher premium is almost always worth it.
The Myth of the “Free Roof” — And Why It Could Land You in Jail
Let’s address the elephant in the room. You’ve probably seen the ads: “Free roof replacement!” “We’ll handle your insurance claim — you pay nothing!” Roofing companies line up after every major storm, promising to get you a brand-new roof at no cost.
Here’s the truth that could save you from a felony charge: It is illegal in most states to waive or absorb a homeowner’s deductible. When a roofing contractor offers to “cover your deductible,” they are essentially inflating their bid to make up the difference — which constitutes insurance fraud.
According to the Coalition Against Insurance Fraud, roofing-related insurance fraud costs the industry an estimated $1.5 billion annually, and homeowners who participate — even unknowingly — can face fines, claim denial, policy cancellation, and criminal prosecution.
What to watch out for:
- Contractors who knock on your door after a storm (storm chasers)
- Anyone who pressures you to sign a contract immediately
- Offers to “waive” or “absorb” your deductible
- Requests to sign an Assignment of Benefits (AOB) — this gives the contractor control over your claim and your insurance payout
Do this instead: Get multiple quotes from established, local roofing contractors with verifiable references. Check their license, insurance, and Better Business Bureau rating. And never sign anything you don’t fully understand.
When NOT to File a Roof Damage Claim (Yes, Sometimes You Shouldn’t)
Here’s another counter-intuitive truth: filing a claim isn’t always in your best interest. In some cases, filing a claim can cost you more in the long run than paying for repairs out of pocket.
Do NOT file a claim if:
- The damage is less than or close to your deductible amount
- The damage is cosmetic and doesn’t affect the roof’s function
- You’ve filed multiple claims in the past 3-5 years (insurers track this, and too many claims can trigger premium increases of 20-40% or even non-renewal)
- The damage resulted from wear and tear, neglect, or lack of maintenance (this is almost never covered)
DO file a claim if:
- The damage is significant and clearly caused by a covered peril (hail, wind, fallen tree, etc.)
- There’s active water intrusion or structural compromise
- The repair costs substantially exceed your deductible
- You have thorough documentation supporting the claim
The rule of thumb: If the total repair cost is less than double your deductible, seriously consider paying out of pocket. The potential premium increase over the next 3-5 years could exceed what the insurance company would have paid you.
Your Roof Damage Claim Checklist: Do All of These, In Order
To make this as actionable as possible, here’s your complete checklist. Print it out. Save it. Share it with your family.
- Discover damage → Document with photos, videos, and written notes immediately
- Secure the property → Tarp, board up, prevent further damage (temporary only)
- Review your policy → Know your deductible, coverage type, and exclusions
- File the claim → Call your insurer, get a claim number, note your adjuster’s name
- Hire an independent roofer → Get a detailed written inspection report with photos
- Meet the adjuster prepared → Be present, share your report, ask questions, take notes
- Review the settlement → Check every line item against your independent report
- Negotiate if needed → Dispute in writing, provide evidence, request re-inspection
- Complete repairs → Use a reputable contractor, keep all receipts and documentation
- Recover depreciation (RCV policies) → Submit proof of completed repairs to your insurer
FAQ
How long do I have to file a homeowners insurance claim for roof damage?
Most policies require you to report damage within 30 to 60 days of the event, though this varies by insurer and state. Some policies allow up to one year. The safest approach is to file as soon as you discover damage — even if you’re unsure whether you’ll ultimately pursue the claim. You can always withdraw a claim, but you can’t file one after the deadline has passed.
Will filing a roof claim increase my homeowners insurance premiums?
It can. According to industry data, filing a single claim can increase your premiums by an average of 9-20%, depending on your insurer, claim history, and location. If you’ve filed multiple claims within the past 3-5 years, the increase can be even higher, and some insurers may choose not to renew your policy. This is why it’s important to weigh the cost of repairs against the potential long-term premium impact before filing.
What if my roof damage claim is denied?
If your claim is denied, you have several options. First, request a written explanation of the denial. Then, review your policy to understand the stated reason. If you believe the denial is unjustified, you can: (1) file an appeal with supporting documentation, (2) hire a public adjuster to advocate on your behalf, (3) request mediation or appraisal as outlined in your policy, or (4) file a complaint with your state’s Department of Insurance. Many denied claims are successfully overturned with proper documentation and persistence.
Does homeowners insurance cover roof leaks?
It depends on the cause. Homeowners insurance typically covers roof leaks caused by sudden, accidental events such as storms, hail, wind, fallen trees, or fire. It generally does not cover leaks caused by wear and tear, lack of maintenance, gradual deterioration, or aging. The key distinction is whether the damage was sudden and unforeseen versus gradual and preventable.
Should I get my roof inspected before filing a claim?
Absolutely. Getting an independent roof inspection from a licensed contractor before or shortly after filing your claim is one of the smartest moves you can make. The contractor’s report provides professional documentation of the full extent of damage, which you can use to verify or challenge the insurance adjuster’s estimate. This step alone can increase your payout by thousands of dollars.
Can I choose my own roofing contractor for an insurance claim?
Yes. In most states, you have the legal right to choose your own contractor. Your insurance company may recommend or provide a list of “preferred” contractors, but you are not obligated to use them. Choose a licensed, insured, local contractor with a strong reputation and verifiable references. Be cautious of any contractor who pressures you to sign an Assignment of Benefits (AOB) or offers to waive your deductible.
How long does it take to get paid after filing a roof damage claim?
The timeline varies by state and insurer, but most states require insurance companies to acknowledge a claim within 15 days and make a payment decision within 30 to 60 days of receiving proof of loss. In practice, straightforward claims are often settled within 2-4 weeks, while complex or disputed claims can take several months. Filing promptly and providing thorough documentation are the best ways to speed up the process.
The Bottom Line: Knowledge Is Your Most Powerful Tool
Filing a homeowners insurance claim for roof damage doesn’t have to be a nightmare. But it does require preparation, documentation, and a willingness to advocate for yourself. The insurance company has teams of professionals working to protect their bottom line. You need to be equally prepared to protect yours.
Remember: document everything, get an independent inspection, know your policy, and never accept the first offer without scrutiny. These four actions alone will put you ahead of the vast majority of homeowners who leave money on the table — or get nothing at all.
Your roof protects everything you love. Make sure your insurance actually protects your roof.
If this guide helped you understand the roof damage claim process, share it with someone who needs to see it — a neighbor, a friend, a family member. You never know when a storm will hit, and the person who’s prepared is the one who comes out ahead. Tag someone below who should read this before their next claim.